Did you know that, according to oral hygiene statistics, nearly 40% of people say they notice a smile before any other physical feature? With the Snow Teeth Whitening system, you are on the verge of joining the ranks of those flashing pearly whites with confidence. But before the transformation begins, you must first learn the proper way to open your Snow Teeth Whitening case. Bypass any frustration and get straight to brightening your grin with these simple yet pivotal Snow Teeth Whitening instructions.
Whether it’s your first time venturing into at-home teeth whitening, or you’re a seasoned enthusiast, the thought of beginning a new regimen comes with a mix of excitement and a tad of confusion. The key to a seamless start is understanding the right technique to open the Snow Teeth Whitening case. It’s more than just a box; it’s the gateway to your enhanced smile. Ensure that your journey towards a gleaming set of teeth kicks off without a hitch by mastering this crucial first step.
Understanding Your Snow Teeth Whitening Kit
Welcome to the world of enhanced dental beauty with your new Snow Teeth Whitening kit! To ensure you’re fully equipped for a seamless whitening journey, it’s important to familiarize yourself with all the Snow Teeth Whitening components and contents you’ll find inside the box. By understanding the proper setup, you’re taking a crucial step towards unlocking a brighter smile. Let’s dive in and explore what makes this kit your go-to choice for at-home teeth whitening.
What’s Inside the Box?
Your Snow Teeth Whitening kit arrives filled with everything needed to begin transforming your smile from the comfort of your home. Inside, you’ll find the patented LED whitening technology, several whitening wands pre-filled with Snow’s alluring serum, a user-friendly instruction manual, and the distinguished Snow Teeth Whitening case. This case not only protects your whitening wands between sessions but it also acts as a luxurious reminder of the care you’re investing into your smile. Every element is there to ensure your teeth whitening process is as efficient and effective as possible.

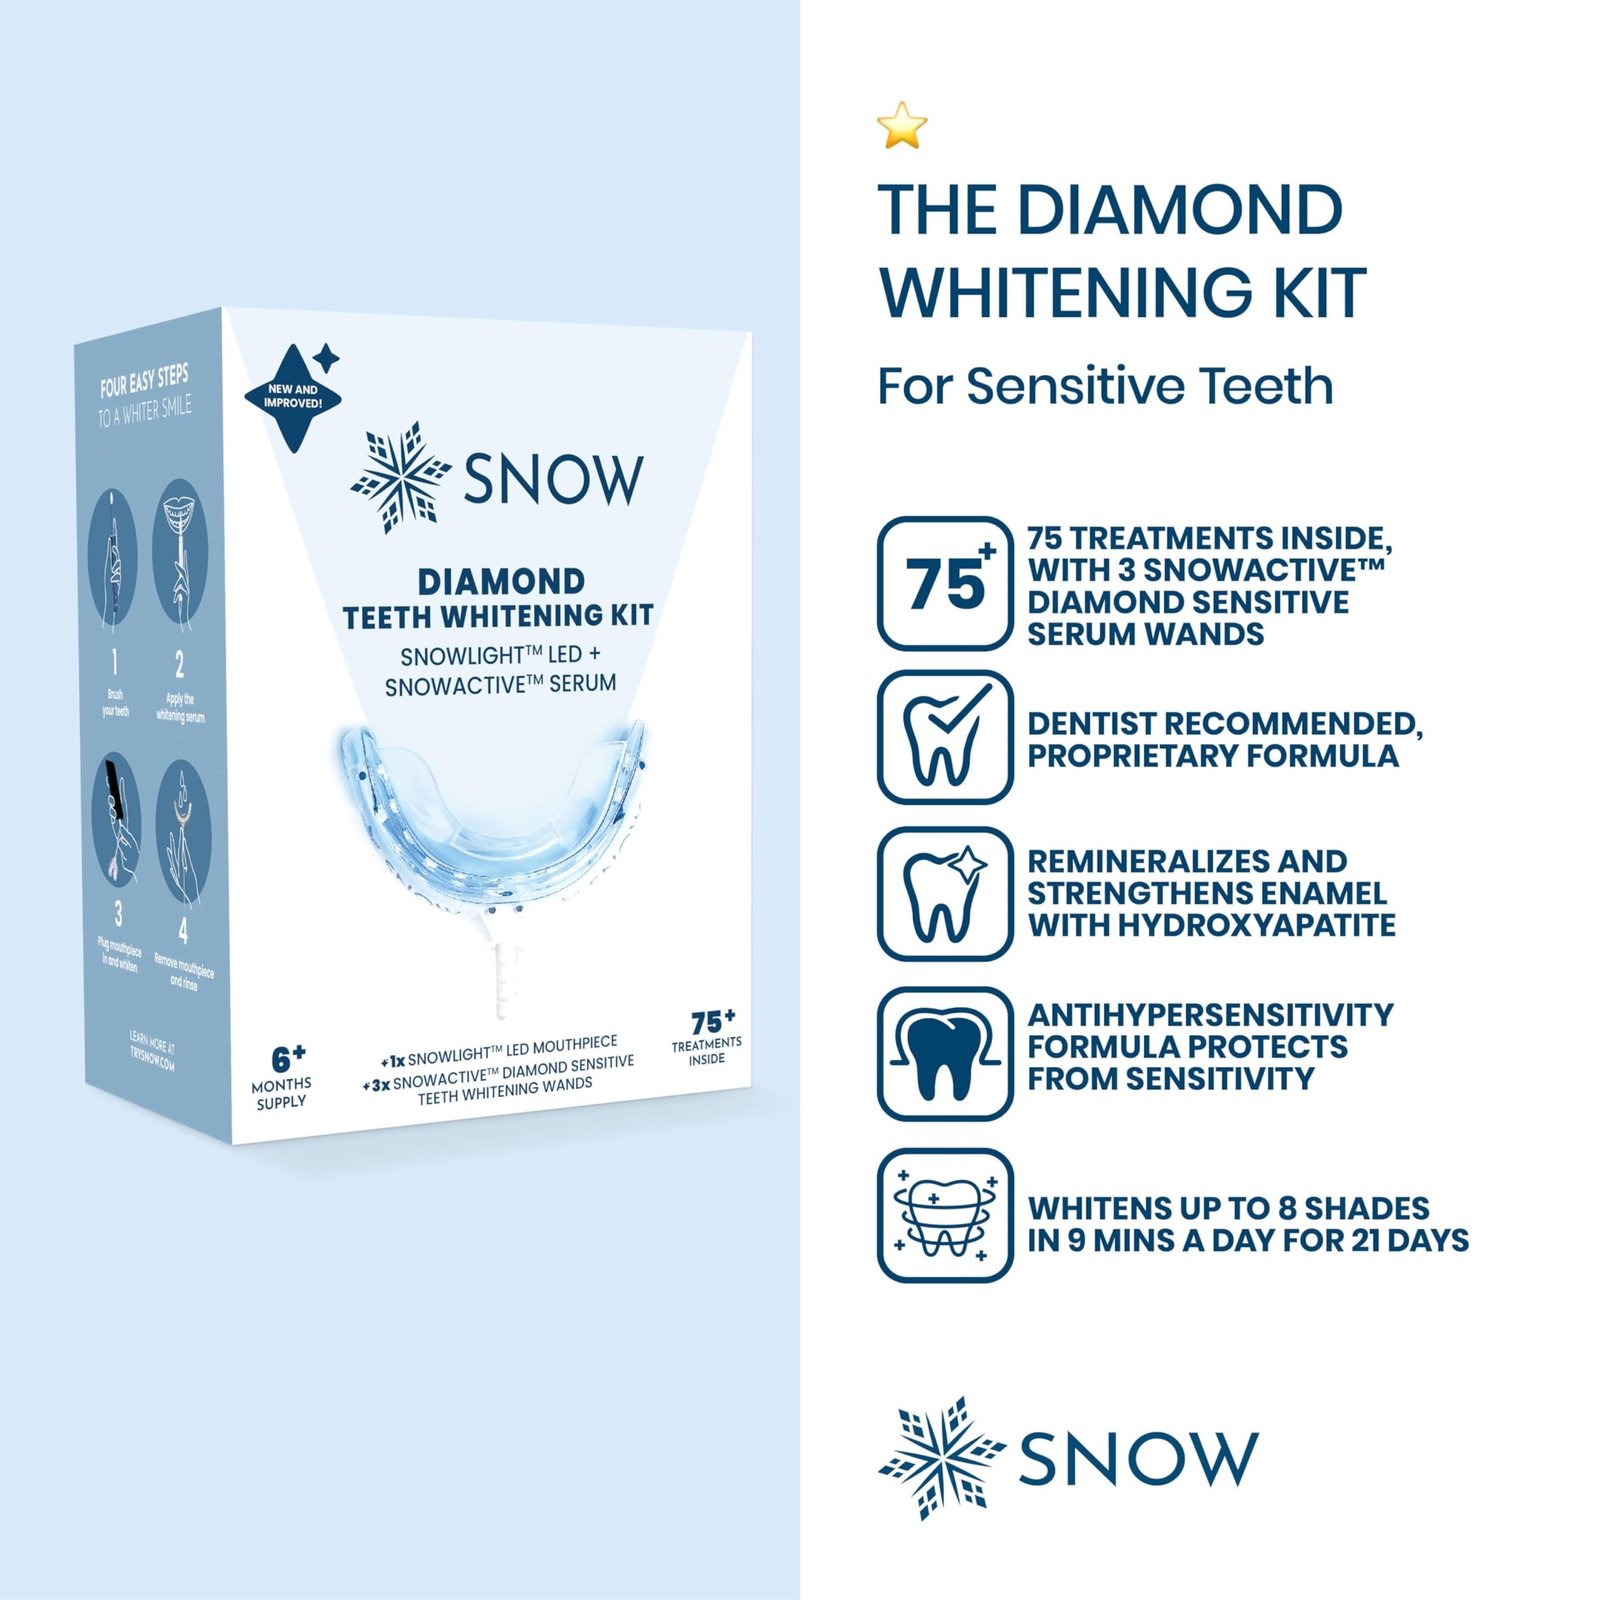
Snow Diamond Teeth Whitening Kit with LED Light,3 Whitening Wands, LED Mouthpiece, Shade Guide,Complete at-Home Teeth Whitener System
Identifying the Snow Teeth Whitening Case
Among the plethora of Snow Teeth Whitening contents, the sleek case stands out. It’s designed to hold your whitening wands and keep them safe from exposure to light and contaminants. Identifying it is easy—look for the high-quality, durable shell with the distinctive Snow logo. This case is integral for the longevity of your whitening serums, symbolizing the premium quality of the Snow brand.
Preparation Steps Before Opening
It’s essential to establish a proper setup before you unwrap the wonders within your Snow Teeth Whitening kit. Initially, make sure you have a clean surface to work on. Wash your hands to avoid transferring any dirt or oils to the components, and dry them thoroughly. Then, organize the contents neatly, so each item is accessible and easy to reach during your whitening routine. Following these precautionary steps ensures you’re maintaining the highest standards of hygiene and care as you embark on your teeth whitening process.
Step-by-Step Guide to Opening the Case
Welcome to your Snow Teeth Whitening how-to guide for accessing your new Snow Teeth Whitening kit. You’re about to embark on the journey to a brighter smile, and it all starts with opening the case. Follow these straightforward steps to unlock the full potential of your teeth whitening system.
First things first, locate the top lid of your Snow Teeth Whitening case. You should see a smooth, ergonomic design that’s not only stylish but functional as well.
- Gently grip the case with one hand while using the other hand to find the recessed area on the lid.
- Using a small amount of pressure, press downwards on the recessed area to release the lid’s latch.
- Lift the lid slowly to reveal the neatly arranged whitening system inside.
Once opened, you’ll discover all the components you need for your whitening sessions, including the LED mouthpiece, whitening wands, and a user manual for additional guidance.
- LED Mouthpiece: This device uses advanced technology to accelerate your whitening process.
- Whitening Wands: Filled with the whitening serum, they’re essential for applying the formula to your teeth.
- User Manual: It provides additional instructions and safety information, ensuring you use the product effectively and safely.
By following these steps, you’ve successfully accessed your Snow Teeth Whitening kit. Rest assured, having the right instructions and gentle touch will keep your kit in excellent condition for numerous whitening experiences.
Remember, a patient and systematic approach to opening your kit is crucial to preserving the integrity of the Snow Teeth Whitening components.
Maintaining and Storing Your Snow Teeth Whitening Kit
Caring for your Snow Teeth Whitening system goes beyond achieving that perfect smile; it extends to the meticulous maintenance and storage of your kit. Ensuring it’s kept in excellent condition guarantees effective sessions, time after time. Here’s an easy-to-follow regimen for the optimal Snow Teeth Whitening care that will make all the difference.
- After each use, clean the mouthpiece with warm water, wiping it down gently to remove any saliva or residue.
- Allow the mouthpiece to air dry before placing it back in the case; a damp environment could harbor bacteria.
- Keep the whitening serums in a cool, dry place, avoiding direct sunlight which can degrade the formula.
- Make sure all components are dry and secure before storing your Snow Teeth Whitening system, to prolong its lifespan.
If you’ve recently completed a whitening session, consider these tips:
- Inspect all parts for signs of wear. If anything seems amiss, it might be time for a replacement.
- Organize your kit; ensuring serums, mouthpieces, and cords are neatly stored can prevent accidental damage.
- Regularly charge the LED light to keep the battery at optimal health, ready for your next whitening session.
By faithfully following these steps for storing your Snow Teeth Whitening system, not only do you protect your investment, but you also ensure each whitening experience is as good as the first. With the right care, your path to a brighter smile will be effortless and consistently successful.
Spotlight on Teeth Numbers: Managing Each Whitening Session
Understanding the layout of your smile can greatly enhance the teeth whitening effectiveness. Just as you follow a map to reach a destination, you can use a teeth number chart to navigate the whitening process for each session with precision. Here’s how you can use this tool to create a strategic whitening treatment plan that targets each tooth individually for the most impressive results.
Mapping Your Smile: Teeth Numbering Explained
Each tooth in your mouth is assigned a specific number used by dental professionals to identify them accurately. This universal teeth numbering system eases communication and treatment planning, including cosmetic procedures like teeth whitening.
- Upper teeth numbers start at the upper right third molar, designated as tooth #1, and end at the upper left third molar, tooth #16.
- Lower teeth numbers continue from the lower left third molar, tooth #17, to the lower right third molar, tooth #32.
By knowing the numbers of your teeth, you’ll be able to track progress and apply treatments more effectively.
How Teeth Numbers Relate to Whitening Effectiveness
The positioning of each tooth can affect the teeth whitening effectiveness. For example, your incisors (teeth #7-10 and #23-26) are the most visible when you smile and often receive more attention during whitening.
Front teeth tend to exhibit results more prominently due to their size and prominence, which is why they’re essential in your whitening treatment plan.
Rear teeth like molars may require a varied approach, as these are less exposed but still valuable for an even, all-around whiter smile.
Scheduling Sessions According to Teeth Numbers
To maximize your teeth whitening sessions, target specific teeth based on their numbering. Begin with the teeth that are most visible and work your way to those in the back. By creating a schedule that includes the numbers of teeth, you can:
- Ensure a balanced whitening effect across all teeth.
- Monitor the progress of specific areas over time.
- Adjust your whitening treatment plan based on the results of each session.
This methodical approach leads to a more tailored and effective whitening experience.
Troubleshooting Common Issues When Opening the Case
Encountering Snow Teeth Whitening problems when trying to open your case can be frustrating, especially when you’re ready to embark on your whitening journey. We understand your eagerness to achieve a brighter smile and rest assured, we’re here to help you overcome any Snow Teeth Whitening case issues you may face.
Below are some common difficulties users might encounter, along with practical solutions to get your case open and your whitening session back on track:
- Case Won’t Budge: Ensure you’re opening the case correctly. Apply gentle, yet firm pressure where the case clips together and look for any tabs or notches that might indicate a locking mechanism.
- Stiff Hinges: If the case seems stiff, do not force it open. Instead, try to wiggle it gently back and forth to loosen the hinge without causing damage.
- Case Sealed Tight: Sometimes, the whitening gel residue can cause the case to seal shut. Clean around the edge of the case with a damp cloth, which could help in breaking the seal.
If these methods don’t resolve the problem, it might be worthwhile to contact customer support for personalized assistance. Remember, dealing with Snow Teeth Whitening problems with patience will prevent breakage to the case or its contents, saving you time and resources in the longer term.
As per numerous customer reviews, maintaining your Snow Teeth Whitening kit after each use can greatly minimize the risk of encountering case issues in the future.
With a little troubleshooting, you can continue to maintain your oral hygiene routine uninterrupted. Keep smiling, knowing that your radiant teeth are just a case opening away.
Getting the Most Out of Your Snow Teeth Whitening Experience
Maximizing the benefits of your Snow Teeth Whitening kit comes down to how effectively you use it. Here, we’re diving into a realm of tips and strategies designed to enhance your tooth whitening process. Whether it’s your first time brightening that smile or you’re a seasoned user looking for advanced insights, the following methods will ensure you achieve the most dazzling results.
Optimal Usage Tips for Snow Teeth Whitening
Understanding the best ways to use the Snow Teeth Whitening system is crucial for maintaining your kit and getting those pearly whites. First, always start with a clean mouth; brush your teeth gently but thoroughly before applying the whitening serum. Apply the serum evenly across your tooth surfaces—less is more here, as you want to avoid gum irritation. Once you’ve wrapped up a session, rinse your mouth and the mouthpiece, then store your kit in a cool, dry place.
Advanced Techniques for Stubborn Stains
Dealing with tough stains requires a bit more finesse. Incorporate these advanced Snow Teeth Whitening techniques to tackle stubborn discolorations:
- Intensify session duration gradually, monitoring your teeth’s response to the serum.
- Use the extra-strength whitening serum provided for deep stains but do so sparingly.
- Consistency is key—stick to your whitening regimen, as repeated sessions can break down difficult stains over time.
Remember to pay attention to sensitivity. If your teeth begin to feel uncomfortable, take a break and consider using the desensitizing serum included in your kit.
When to Refill or Replace Your Whitening Serum
The longevity of your whitening serum is a vital component of maintaining your Snow Teeth Whitening kit. Monitor the consistency and color of your serum; if it becomes discolored or the consistency changes, it may be time for a refill. As a general rule, replace your serum every six months to ensure maximum effectiveness. Always keep spare serums on hand so that you’re never caught off-guard when it’s time for a fresh application.


Adhering to these insights will not only prolong the life of your Snow Teeth Whitening kit but also contribute to a consistently bright and confident smile. Put these tips into practice and watch as your teeth transform, reflecting a commitment to exceptional oral hygiene and aesthetic brilliance.
Safety Precautions and Best Practices
When it comes to achieving a radiant smile with the Snow Teeth Whitening system, your well-being is paramount. Adhering to Snow Teeth Whitening safety standards is essential, not only to optimize your results but to ensure your oral health remains intact. Prior to embarking on your teeth whitening journey, it’s advisable to familiarize yourself with the Snow Teeth Whitening guidelines for proper use.
Always begin with a clean canvas; make sure your teeth are thoroughly brushed and flossed. Avoid applying the whitening serum to gums or lips, as it’s designed exclusively for your enamel. If you encounter any sensitivity, this is usually a sign to decrease the frequency or duration of your treatments. Remember, patience is key, and overuse can lead to discomfort.
It’s also imperative to store your whitening components correctly – keep them in a cool, dry place away from direct sunlight to maintain their efficacy. Lastly, if you have dental work such as crowns or fillings, consult with a dental professional regarding the suitability of the Snow Teeth Whitening system for you. By following these guidelines, you empower yourself to enhance your smile confidently and safely.
FAQ
How do I properly open my Snow Teeth Whitening case?
To open your Snow Teeth Whitening case, gently locate the latch or opening mechanism on the side of the case. Press or slide it as indicated by the instructions, and carefully lift the lid to reveal the contents inside. Handle with care to ensure the components stay secure.
What should I find inside my Snow Teeth Whitening kit?
Inside your Snow Teeth Whitening kit, you’ll typically find the LED mouthpiece, whitening wands with serum, a shade guide, and a user manual. The exact contents may vary depending on the specific package you purchased, so check the included list against the contents to ensure everything is present.
Are there any steps I should take before opening my Snow Teeth Whitening case for the first time?
Yes, before opening your Snow Teeth Whitening case, make sure to wash your hands to avoid contamination. Additionally, set up a clean workspace where you can organize the components as you take them out, and read through the user manual to familiarize yourself with each item and the recommended usage.
What are some tips for maintaining and storing my Snow Teeth Whitening kit after use?
To maintain and store your Snow Teeth Whitening kit, clean the mouthpiece after each use with warm water, and dry it before placing it back in the case. Store the whitening wands with serum in an upright position if possible, and keep the kit in a cool, dry place away from direct sunlight.
Can you explain the teeth numbering system and how it affects my whitening sessions?
The teeth numbering system is a way that dentists identify each tooth using a specific number. Understanding this system can help you target specific teeth during your whitening sessions, allowing for more precise and effective treatment. For instance, if you want to focus on whitening your front teeth, you could concentrate on numbers 6-11 on the upper arch and 22-27 on the lower arch.
What should I do if I have trouble opening my Snow Teeth Whitening case?
If you encounter difficulty with opening your Snow Teeth Whitening case, ensure that you’re using the correct method as prescribed by the instructions. If the case still won’t open, check for any visible obstructions or damage. In case the problem persists, contact Snow customer service for assistance to resolve the issue without damaging the kit.
How can I maximize the effectiveness of my Snow Teeth Whitening experience?
To maximize the effectiveness of your Snow Teeth Whitening experience, follow the recommended usage instructions closely, use the serum sparingly to prevent waste, and maintain consistent whitening sessions. For tougher stains, consider a few additional sessions or consult with your dentist for advice on professional treatment options.
When should I take safety precautions while using the Snow Teeth Whitening system?
Safety precautions should be taken every time you use the Snow Teeth Whitening system. This includes not overfilling the whitening wand to prevent gum irritation, avoiding eating or drinking immediately after treatment, and ensuring you do not use the product on loose teeth or restorative dentistry work. Always read the safety guidelines provided with your kit for complete instructions.