Imagine improving your smile’s brightness by up to five shades in just a few days—this isn’t a distant dream, but the proven potential of Snow Teeth Whitening. With the quest for a bright smile leading 37 million Americans to whiten their teeth in one way or another each year, finding the optimal whitening time without compromising dental health is crucial. Snow Teeth Whitening stands out in this crowded market, promising a high-impact change in a safe and efficient manner.
But what is the secret to harnessing the full power of this innovative whitening system? It is not only the quality of the product but also knowing the ideal teeth whitening duration to strike the perfect balance between a vibrant smile and maintaining tooth integrity. Through this article, you’ll discover just how long to leave Snow Teeth Whitening on for that image-perfect outcome.
Whether you’re prepping for a big event or simply tired of filters and editing tricks to brighten your smile in photos, the answer lies in the application time of this star product. We’ve scoured manufacturer guidelines, sifted through customer reviews, and tapped into expert advice to present you with a safe and effective timeframe for using Snow Teeth Whitening. So gear up to flash your pearly whites with confidence!
Understanding Snow Teeth Whitening Technology
When you’re looking to enhance your smile, it’s essential to choose a whitening solution that delivers results without compromising the health of your teeth. Snow Teeth Whitening has emerged as a pioneering brand in home teeth whitening solutions, thanks to its integration of leading advancements in LED light technology and teeth whitening science. Let’s delve into what makes Snow a standout choice for those aiming to brighten their smiles safely and effectively.
The Science Behind Snow Teeth Whitening
At the heart of Snow’s innovation lies its precision-engineered LED light technology, designed to accelerate the teeth whitening process. Coupled with its enamel-safe formulas, Snow presents a scientifically formulated approach that intensifies the whitening agent while minimizing tooth sensitivity. This dentist-approved method ensures that you can confidently achieve a whiter smile without the risks associated with more aggressive teeth bleaching techniques.
The LED light acts as a catalyst, boosting the performance of whitening agents for faster, more pronounced results.
Benefits of Choosing Snow for a Whiter Smile
Favoring Snow over other brands equates to selecting a home teeth whitening solution that cherishes your enamel as much as you do. Its enamel-safe formulas are crafted to provide powerful whitening effects while preserving your tooth’s integrity. With its ease of use and dentist-approved credentials, Snow empowers you to embrace teeth whitening with confidence, ensuring a safe journey to a brighter smile from the comfort of your home.
- Minimizes tooth sensitivity
- Promotes enamel health
- User-friendly, convenient home treatment
Experience a professional-level whitening, side-stepping the inconvenience and expense of dental visits.
Comparing Snow Whitening to Traditional Methods
How does Snow stand up against traditional teeth whitening methods? In-office treatments offer effective results but often come with a steep price tag and potential discomfort. Over-the-counter (OTC) products, while more accessible, can vary widely in their effectiveness and safety profiles. Snow strikes a balance by providing an affordable, enamel-safe, and efficacious teeth whitening option that aligns with dentist-approved standards.
- Cost-efficient compared to clinical procedures
- Strengthens teeth with less risk than some OTC alternatives
- High-quality whitening from the convenience of home
To encapsulate the advantages of this innovative technology, think of Snow as the hourous bridge between the efficacy of professional treatments and the convenience of at-home care.
Step-by-Step Guide to Using Snow Teeth Whitening Kits
Embarking on the Snow whitening application process is an exciting step towards achieving a dazzling smile from the comfort of your own home. With the right teeth whitening kit instructions, you can indeed achieve professional teeth whitening results without stepping into a dental office. Let’s dive into a comprehensive guide crafted to make your Snow Teeth Whitening experience seamless and effective.


Before you begin, make sure you have your Snow Teeth Whitening Kit unpacked and all components are laid out in front of you. The kit typically includes a whitening serum, a mouthpiece with LED light, a shade guide, and a user manual. Familiarize yourself with these items as they will be vital in your teeth whitening journey.
- Preparation: Start by brushing your teeth with a gentle toothpaste to remove any surface debris. This ensures that the whitening serum can come into direct contact with your teeth for maximum effectiveness.
- Application of Whitening Serum: Twist up the serum pen and apply the whitening agent to your teeth, being careful to avoid your gums. Follow the instructions closely to use the right amount of serum.
- LED Light Mouthpiece: Once the serum is evenly applied, insert the mouthpiece equipped with the LED light. Turn on the light and let it work its magic for the time recommended in the manual.
The LED light enhances the whitening process by accelerating the serum’s effects, ensuring you get those pearly whites in due time. The light itself is designed to be safe for home use, giving you convenience without compromising on quality.
Remember, consistency is key when it comes to teeth whitening. Using the kit as directed, with regular applications, will help you maintain that bright smile year-round.
“Snow Teeth Whitening Kits provide the ease and efficiency of achieving a luminous smile that can boost your confidence exponentially. Follow these steps diligently, and you’re on your way to a brighter smile,” advises a renowned dental professional.
After completing the recommended time under the LED light, remove the mouthpiece and rinse both your mouth and the mouthpiece. Inspect your progress using the shade guide provided.
- Post-Treatment Care: Rinse your mouth thoroughly to remove any remaining serum.
- Repeat the Process: For outstanding results, repeat the process over the course of several days to progressively whiten your teeth to your desired brightness.
By following these teeth whitening kit instructions, you’ll find that achieving a snow-white smile is entirely possible with discipline, patience, and a quality product like the Snow Teeth Whitening Kit. Here’s to a healthier, whiter smile that shines as bright as snow!
How Long Should You Leave the Snow Whitening Serum On?
Embarking on your journey to a brighter smile with Snow Teeth Whitening involves not just the excitement of anticipating pearly whites but also the responsibility of following safe teeth whitening practices. Understanding the correct teeth whitening treatment time is crucial to achieving your desired results without compromising dental health.
When it comes to the Snow serum application duration, experts recommend an optimal timeframe to ensure effectiveness and safety. The serum, designed for ease of use and maximum efficiency, should typically be applied for about 15-30 minutes per session.
“For most users, a 15-30 minute session will suffice. However, those with more sensitive teeth may opt for a shorter duration. Consistency is key to seeing gradual but substantial results.”
Below are some pointers to maximize the efficacy of your Snow Teeth Whitening regimen:
- Begin with clean teeth—ensure your teeth are freshly brushed and flossed before applying the whitening serum.
- Follow the provided instructions—apply a thin layer of the serum directly to your teeth, avoiding gums and lips.
- Use the LED mouthpiece—after applying the serum, insert the LED mouthpiece and turn it on for the recommended time.
- Consistency is crucial—stick to a regular routine, as recommended by Snow, for the best results over time.
- Listen to your teeth—if sensitivity occurs, reduce treatment time and increase intervals between sessions.
Remember, while there is an urge to speed up the whitening process, patience and adherence to safe teeth whitening practices play a significant role in protecting your oral health. The adage ‘slow and steady wins the race’ certainly applies to teeth whitening. By respecting the Snow serum application duration and following a meticulously crafted routine, you’ll be well on your way to that dazzling smile.
Signs You’re Overdoing Teeth Whitening
Seeking a luminous, bright smile is a common goal, but it’s crucial to be vigilant about the health of your teeth and gums while using whitening products like Snow Teeth Whitening. While it’s an effective solution for many, overuse can lead to several dental health concerns. If you’re experiencing any discomfort or changes in your oral cavity, it may be time to reassess your whitening regimen and look for signs of over-whitening.

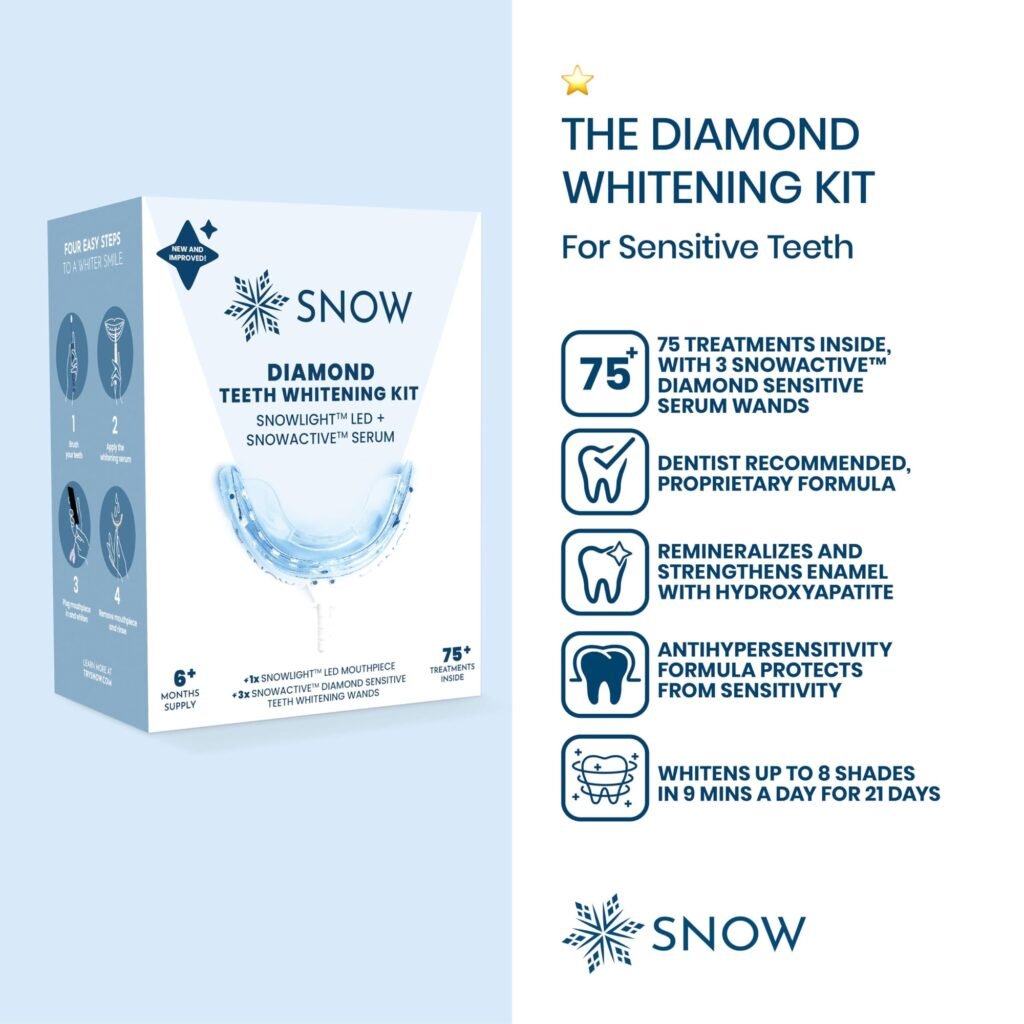
Snow Diamond Teeth Whitening Kit with LED Light,3 Whitening Wands, LED Mouthpiece, Shade Guide,Complete at-Home Teeth Whitener System
Recognizing Tooth Sensitivity and Gum Irritation
If you notice a sharp sensation when consuming hot, cold, sweet, or acidic foods and beverages, you could be dealing with tooth sensitivity, a common ailment associated with overuse of whitening products. Similarly, gum irritation, manifesting as redness, swelling, or soreness may also indicate that the whitening agents are being used too frequently or left on for too long. These symptoms shouldn’t be ignored as they can affect your overall dental health.
Are You Damaging Your Enamel with Excessive Whitening?
Beyond discomfort, over-whitening can lead to enamel damage. Enamel—the hard, protective outer layer of your teeth—can wear down when it is repeatedly exposed to harsh whitening chemicals. Once damaged, enamel does not regenerate, which is why it’s so important to follow safe teeth whitening practices. If your teeth have become more transparent or you’ve noticed an increase in fractures or chips, it could signal that your enamel has been compromised. To prevent these issues, always adhere to the recommended usage guidelines and speak with a dental professional if you have concerns about your teeth whitening routine.
FAQ
How long should I leave Snow Teeth Whitening on for the best results?
For optimal whitening results without damaging your teeth, it’s recommended to follow the manufacturer’s guidelines which generally suggest leaving Snow Teeth Whitening on for 9 to 30 minutes per session. However, it’s always wise to consult with your dentist for personalized advice tailored to your dental health.
What is Snow Teeth Whitening technology and how does it work?
Snow Teeth Whitening utilizes advanced LED light technology paired with enamel-safe whitening formulas to effectively remove stains on your teeth. The LED light accelerates the whitening process initiated by the whitening serum, aiming to deliver a bright smile safely from the comfort of your home.
Why should I choose Snow Teeth Whitening over traditional methods?
Snow Teeth Whitening offers several benefits, including the convenience of home use, the innovative LED light technology, enamel-safe ingredients, and formulas that are often preferred over in-office treatments or over-the-counter products. Furthermore, Snow’s products are typically dentist-approved and can provide professional-level whitening results with the correct application.
Can you provide step-by-step instructions for using the Snow Teeth Whitening Kit?
To use the Snow Teeth Whitening Kit effectively, start by brushing your teeth to clean away any plaque or debris. Apply the whitening serum to your teeth with the brush provided, avoiding your gums to minimize irritation. Turn on the LED light mouthpiece and leave it on along with the serum for the recommended time. After usage, rinse your mouth and the mouthpiece with water. For detailed steps and additional tips, refer to the official user manual and seek advice from a dental professional if needed.
How long should I leave the Snow Whitening Serum on my teeth?
As per Snow’s product specifications, it is generally safe to leave the Snow Whitening Serum on your teeth for 9 to 30 minutes. Keep to the lower end of the spectrum if you have sensitive teeth and gradually build up as your comfort permits. It’s important to not exceed the recommended duration to avoid over-whitening and potential enamel damage.
What are the signs that I am overdoing teeth whitening?
If you are experiencing increased tooth sensitivity, gum irritation, or signs of enamel damage, such as dullness or transparency at the edges of your teeth, these could be indications that you’re overdoing teeth whitening. It’s crucial to take these signals seriously and consult with your dentist to avoid long-term damage to your teeth or gums.
How can I be sure that I am not damaging my enamel with excessive whitening?
To ensure you’re not damaging your enamel with excessive whitening, adhere to the whitening product’s instructions carefully, and avoid overusing or leaving whitening agents on for too long. If you notice any discomfort or changes in the appearance of your teeth, stop whitening and consult with your dentist for an evaluation and professional guidance.