

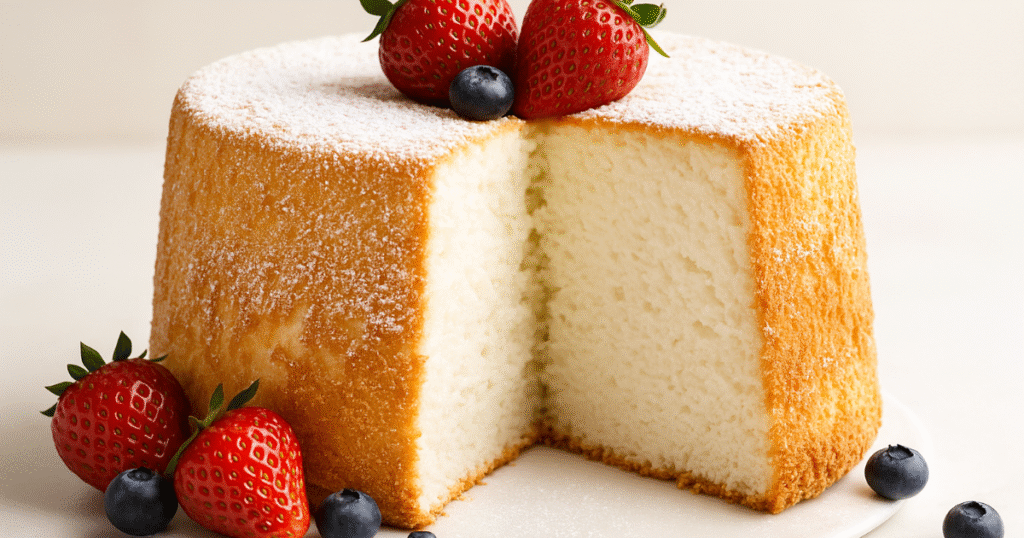
There’s something magical about an angel food cake recipe done right. That first forkful — impossibly soft, delicately sweet, and airy as a cloud — feels like a small miracle. Every bite melts in your mouth, leaving behind that hint of vanilla and nostalgia that reminds me of Sunday dinners at my grandma’s house.
When I first tried making angel food cake from scratch, I’ll admit — I was intimidated. All those egg whites? The stiff peaks? The part where you have to cool the cake upside down? It sounded like something out of a baking competition show. But once I understood the “why” behind each step, I realized it’s not difficult — it’s just a recipe that rewards patience and a little care.
So today, I’m walking you through my tried-and-true perfect angel food cake. You’ll learn how to stabilize the egg whites, fold the dry ingredients without deflating them, and achieve that signature bounce every time. Ready to bake something truly heavenly? Let’s dive in.
Why You’ll Love This Recipe
If you’ve never made an angel food cake before, this is the recipe that will win you over completely.
- Light as air: The whipped egg whites make it fluffy and cloud-like.
- Perfectly sweet: Sweet but never cloying — pairs beautifully with lemon curd or fresh berries.
- Healthier dessert option: No butter or oil, yet it feels indulgent.
- Beginner-friendly: Step-by-step instructions make it easy for first-timers.
- Versatile: Serve plain, with glaze, or topped with homemade whipped cream.
This cake doesn’t just taste good — it feels special. It’s the kind of dessert that brings smiles, whether it’s for a summer picnic, Easter brunch, or just a treat-yourself afternoon.
Ingredients You’ll Need
The beauty of this cake lies in its simplicity — just a few basic ingredients, but precision is everything. Here’s what you’ll need:
Dry Ingredients
- 1 cup cake flour – Sifted several times for an ultra-light texture.
- 1 ½ cups granulated sugar – Divided; part for the flour mix, part for stabilizing the egg whites.
- ¼ teaspoon salt – Balances sweetness and enhances flavor.
Wet Ingredients
- 12 large egg whites (room temperature) – The star of the show! They provide the structure and lift.
- 1 ½ teaspoons cream of tartar – Helps stabilize the egg whites and achieve stiff peaks.
- 1 teaspoon pure vanilla extract – Adds subtle sweetness and aroma.
- ¼ teaspoon almond extract (optional) – Gives a delicate, nutty background note.
For Serving (Optional but Recommended)
- Homemade whipped cream
- Fresh berries (strawberries, blueberries, raspberries)
- Lemon curd for a tart, bright contrast
Quick Glance: Times
| Step | Time |
|---|---|
| Prep Time | 20 minutes |
| Cook Time | 40–45 minutes |
| Cooling Time | 2 hours (cool upside down) |
| Total Time | About 3 hours |
Ingredient Substitutions
Here are a few ways to adjust the recipe to fit your pantry or dietary needs:
- Cake Flour Substitute: Mix 1 cup all-purpose flour with 2 tablespoons cornstarch, sift 5–6 times.
- Cream of Tartar Substitute: Use 1 teaspoon lemon juice or white vinegar for similar stabilization.
- Sugar Alternative: Use superfine sugar if you prefer a finer crumb — but avoid coarse sugar, which can weigh down the batter.
- Flavor Twist: Swap vanilla extract for lemon or orange extract for a citrusy version.
- Gluten-Free Option: Use a finely milled gluten-free flour blend designed for cakes.
How to Make Angel Food Cake Recipe
Follow these steps carefully — this cake rewards gentle, deliberate actions. Think of it as baking meditation!
Step 1: Preheat and Prepare the Pan
Preheat your oven to 350°F (175°C). Do not grease your pan — angel food cake needs to climb the sides to rise properly.
Use an ungreased tube pan (angel food pan) with a removable bottom if possible.
Step 2: Sift the Dry Ingredients
In a medium bowl, sift together:
- Cake flour
- ¾ cup of the granulated sugar
- Salt
Sift them three times to ensure they’re completely light and lump-free. The goal is to incorporate air and prevent clumps when folding into the egg whites later.
Step 3: Whip the Egg Whites
In a large mixing bowl (make sure it’s spotless and free of grease), add:
- 12 egg whites
- Cream of tartar
Beat on medium speed until soft peaks form. Gradually add the remaining ¾ cup sugar, about 2 tablespoons at a time, while continuing to beat.
Increase speed to high and whip until stiff peaks form — glossy, white, and holding their shape. When you lift the whisk, the tip should stand straight up without collapsing.
Pro Tip: Avoid overbeating! Overwhipped egg whites can become dry and grainy, making it hard to fold in the flour later.
Step 4: Add the Flavorings
Gently beat in the vanilla extract and optional almond extract until just combined. The aroma at this stage will make your kitchen smell divine!
Step 5: Fold in the Dry Ingredients
Using a fine-mesh sifter or sieve, sift the flour mixture in three parts over the whipped egg whites.
Use a rubber spatula to fold it in gently — scoop from the bottom and fold over the top in a circular motion. Rotate the bowl as you go to evenly incorporate without deflating the batter.
This step is all about patience and a light hand.
Step 6: Transfer to the Pan
Pour the batter into your ungreased tube pan. Run a knife or skewer through the batter to pop any air pockets. Smooth the top gently with your spatula.
Step 7: Bake Until Golden
Bake for 40–45 minutes, or until the cake is golden brown and springs back lightly when touched.
You’ll know it’s ready when a toothpick inserted near the center comes out clean.
The smell? Sweet, vanilla heaven.
Step 8: Cool the Cake Upside Down
Here’s the signature move: remove the cake from the oven and immediately invert the pan upside down.
You can rest it on a bottle neck or the pan’s built-in legs if it has them. Cooling upside down prevents the cake from collapsing and helps it retain that lofty height.
Let it cool completely — at least 2 hours.
Step 9: Release the Cake
Once cooled, run a thin knife around the edges of the pan (including the center tube) to loosen it.
Invert onto a cake plate or stand and gently lift the pan away.
Step 10: Serve and Enjoy
Slice with a serrated knife (a regular knife can compress the delicate crumb).
Serve plain, with fresh berries and homemade whipped cream, or drizzle with lemon curd for an elegant twist.

Expert Tips & Mistakes to Avoid
- Use room-temperature egg whites: They whip higher and more evenly.
- No grease allowed: Fat interferes with egg white stability — ensure your bowl and utensils are spotless.
- Don’t open the oven early: Sudden drops in temperature can deflate the cake.
- Cool completely upside down: This step is key to maintaining height and texture.
- Cut with a serrated knife: It preserves the cake’s airy crumb instead of squishing it.
Variations & Add-Ons
Make your angel food cake even more special with these fun twists:
Citrus Dream
Add 1 tablespoon of grated lemon zest or orange zest to the dry ingredients for a fresh, zippy flavor.
Berry Bliss
Fold in a handful of finely chopped strawberries or top slices with a mixed berry compote.
Chocolate Lovers’ Version
Replace 2 tablespoons of flour with unsweetened cocoa powder and dust the top with powdered sugar.
Herbal Touch
Infuse the sugar with lavender or mint leaves for a subtle aromatic layer.
Tropical Twist
Serve with toasted coconut flakes and a dollop of pineapple curd for a summery spin.
Serving Suggestions
- Classic: With a generous swirl of whipped cream and fresh berries.
- Elegant: Layer slices with lemon curd and raspberries for a trifle-style dessert.
- Simple & Sweet: Dust with powdered sugar and serve with coffee or tea.
- Celebratory: Add a drizzle of chocolate ganache for special occasions.
Pro Tip: The subtle sweetness of angel food cake makes it perfect for pairing with tart fruits like raspberries or citrus.
Storage & Reheating
Room Temperature:
Keep covered tightly in plastic wrap or an airtight container for up to 2 days.
Refrigerate:
Store in the fridge for up to 5 days. Let it come to room temperature before serving for best texture.
Freeze:
Wrap slices or the whole cake in plastic wrap, then foil, and freeze for up to 3 months. Thaw overnight in the fridge or at room temperature.
Avoid reheating — this cake is best enjoyed fresh or chilled!
Nutrition Information (Per Slice)
| Nutrient | Amount |
|---|---|
| Calories | 140 kcal |
| Protein | 4 g |
| Fat | 0 g |
| Carbohydrates | 31 g |
| Sugar | 25 g |
| Sodium | 80 mg |
| Fiber | 0 g |
Frequently Asked Questions
Why did my angel food cake collapse?
It likely cooled right-side up or was underbaked. Always cool the cake upside down to prevent collapse and maintain its height.
Can I use a bundt pan instead of a tube pan?
Not recommended — the design of a tube pan allows even rising, better airflow, and easy release, which bundt pans don’t provide.
How do I know when my egg whites reach stiff peaks?
When you lift the whisk, the peak should stand tall and glossy without drooping — that’s the sign of perfectly stiff peaks.
Can I make this recipe with boxed egg whites?
Fresh egg whites work best. Boxed versions often contain stabilizers that prevent proper whipping and volume.
Why do I have to cool the cake upside down?
Cooling the cake upside down uses gravity to help maintain its airy structure and prevents the delicate crumb from collapsing.
What can I serve with angel food cake?
Lemon curd, whipped cream, and fresh berries are classic pairings that enhance the light sweetness of angel food cake beautifully.
Conclusion
This angel food cake recipe is one of those desserts that makes people stop and smile after the first bite. Light, cloud-like, and perfectly sweet — it’s proof that simplicity can be spectacular.
Don’t be intimidated by the egg whites or the “cool upside down” step. Once you understand the rhythm, it’s a joy to make — and the reward is a show-stopping cake that feels effortlessly elegant.
So the next time you’re looking for a dessert that’s both nostalgic and impressive, grab your tube pan, whip those egg whites to stiff peaks, and bake yourself a slice of heaven.
And hey — don’t forget to reward yourself with a little “quality control” taste test once it’s cooled. You earned it.

Angel Food Cake Recipe
Ingredients
- Dry Ingredients
- 1 cup cake flour – Sifted several times for an ultra-light texture.
- 1 ½ cups granulated sugar – Divided; part for the flour mix part for stabilizing the egg whites.
- ¼ teaspoon salt – Balances sweetness and enhances flavor.
- Wet Ingredients
- 12 large egg whites room temperature – Provide the structure and lift.
- 1 ½ teaspoons cream of tartar – Helps stabilize the egg whites and achieve stiff peaks.
- 1 teaspoon pure vanilla extract – Adds sweetness and aroma.
- ¼ teaspoon almond extract optional – For a delicate, nutty background note.
- For Serving Optional
- Homemade whipped cream
- Fresh berries strawberries, blueberries, raspberries
- Lemon curd
Instructions
- Preheat and Prepare the Pan
- Preheat oven to 350°F (175°C). Do not grease your pan — angel food cake needs to climb the sides to rise properly. Use an ungreased tube pan with a removable bottom if possible.
- Sift the Dry Ingredients
- In a medium bowl, sift together the cake flour, ¾ cup sugar, and salt. Sift three times to keep the mixture light and lump-free.
- Whip the Egg Whites
- In a large, grease-free bowl, add the egg whites and cream of tartar. Beat on medium speed until soft peaks form. Gradually add the remaining ¾ cup sugar, two tablespoons at a time, while continuing to beat.
- Increase to high speed and whip until stiff peaks form — glossy and firm.
- Add Flavorings
- Gently beat in vanilla and almond extract until just combined.
- Fold in Dry Ingredients
- Sift the flour mixture in three parts over the whipped egg whites. Use a rubber spatula to fold gently — scoop from the bottom and fold over the top without deflating the batter.
- Transfer to the Pan
- Pour the batter into the ungreased tube pan. Run a knife or skewer through the batter to pop air pockets and smooth the top.
- Bake Until Golden
- Bake for 40–45 minutes, or until golden brown and springy to the touch. A toothpick should come out clean when inserted.
- Cool Upside Down
- Immediately invert the pan upside down on a bottle neck or its legs to cool. Let cool completely for about 2 hours.
- Release the Cake
- Once cool, run a knife around the edges and center tube to loosen. Invert onto a plate.
- Serve and Enjoy
- Slice with a serrated knife and serve with whipped cream, lemon curd, or fresh berries.
Notes
- Use room-temperature egg whites for best volume.
- Make sure your bowl and whisk are grease-free; fat prevents proper whipping.
- Avoid opening the oven too early — the cake can collapse.
- Always cool the cake upside down to retain its height and fluffiness.
- Slice with a serrated knife to avoid compressing the airy texture.
- Store at room temperature (2 days), in the fridge (5 days), or freeze (3 months).
- Pairs beautifully with lemon curd, fresh berries, or homemade whipped cream for serving.