


If you grew up around potlucks, Sunday dinners, or holiday dessert tables, chances are you’ve crossed paths with a classic chocolate pie recipe at least once. For me, chocolate pie was the dessert my aunt always brought—the one that disappeared first, with only a few smears of chocolate pudding left behind as evidence. I remember standing on a chair in her kitchen, watching the stovetop, waiting for the filling to thicken while she reminded me (again) not to touch the hot pan.
Years later, I realized what made that pie so special wasn’t fancy technique or rare ingredients. It was simple, homemade chocolate done right. This recipe is my modern, reliable version—rich but not heavy, smooth but not fussy, and completely doable even if this is your first homemade pie. I’ll walk you through the ingredients, the steps, common mistakes, and fun variations so you can make a chocolate pie you’ll be proud to share.
Why You’ll Love This Recipe
- Truly easy pie with straightforward steps and pantry staples
- Silky chocolate filling that sets perfectly every time
- Flexible options using homemade or store bought crust
- Family-friendly and nostalgic, yet impressive enough for guests
- Perfect make-ahead dessert that just needs to chill in the fridge
Ingredients You’ll Need
This is a classic, custard-style chocolate pie made on the stovetop. No baking required for the filling.
For the Pie Crust
- 1 (9-inch pie) homemade pie crust, baked and cooled
You can absolutely use a store bought crust—no shame here.
For the Chocolate Filling
- 1 cup granulated sugar
- ¼ cup unsweetened cocoa
Use good-quality cocoa for deeper chocolate flavor. - ¼ cup cornstarch
- ¼ tsp salt
- 3 cups whole milk
Whole milk gives the creamiest texture. - 4 large egg yolks
These create richness and structure. - 2 tbsp unsalted butter
- 1 tsp vanilla extract
For Topping
- Fresh whipped cream
Light, airy, and perfect against the rich chocolate pie.
Ingredient Substitutions
Chocolate pie is forgiving, which is one reason I love it.
- Store bought crust: Saves time and still tastes great
- Dairy-free milk: Use full-fat coconut milk for a richer, slightly tropical note
- Butter substitute: Vegan butter works well
- Sugar alternative: Coconut sugar adds a deeper, caramel-like flavor
- Extra chocolate: Stir in chopped dark chocolate at the end for an ultra-decadent filling
How to Make Chocolate Pie Recipe
This part is all about patience and paying attention. The filling tells you when it’s ready.
1. Prepare the Crust
Make sure your 9-inch pie crust is fully baked and completely cooled before adding the filling. A warm crust can cause condensation and a loose set.
2. Mix the Dry Ingredients
In a medium saucepan (off heat), whisk together:
- Sugar
- Unsweetened cocoa
- Cornstarch
- Salt
Break up any cocoa lumps now—it makes everything smoother later.
3. Add Milk and Egg Yolks
Slowly whisk in the milk until smooth.
Add the egg yolks and whisk until fully incorporated.
Don’t rush this step. A smooth base means a smooth chocolate filling.
4. Cook the Chocolate Filling
Place the saucepan over medium heat. Cook, whisking constantly, for 8–10 minutes.
You’ll notice the mixture:
- First warms
- Then thickens
- Then turns glossy and pudding-like
The smell will tell you when it’s ready—deep chocolate, slightly sweet, impossible to ignore.
5. Finish the Filling
Once thickened:
- Remove from heat
- Stir in butter and vanilla extract
- Whisk until fully melted and smooth
I always sneak a spoonful here. Quality control taste-test, right?
6. Fill and Chill
Pour the hot chocolate pudding into the cooled pie crust. Smooth the top.
Cover loosely and chill in the fridge for at least 4 hours, preferably overnight.
This chilling time is non-negotiable—it’s what gives the pie clean slices.
7. Top and Serve
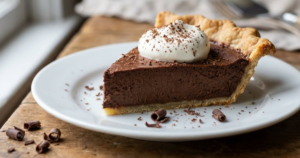
Right before serving, spread or pipe whipped cream over the top.
You’ve officially made a homemade chocolate pie that rivals any bakery version.


Expert Tips & Mistakes to Avoid
- Whisk constantly once heat is applied to avoid lumps
- Don’t crank the heat—medium is perfect
- Strain the filling if you want an ultra-smooth texture
- Let it fully chill before slicing (this is the hardest part)
- Use real vanilla extract, not imitation—it matters here
Variations & Add-Ons
This chocolate pie recipe is a great base for creativity.
Gluten-Free
Use a gluten-free pie crust and double-check your cocoa and cornstarch labels.
Dairy-Free
Use coconut milk and vegan butter. Top with coconut whipped cream.
Flavor Twists
- Mocha: Add 1 tsp instant espresso powder
- Mint: Add ¼ tsp peppermint extract
- Peanut Butter: Swirl melted peanut butter into the filling
- Deep dish version: Increase filling by 25% for a deep dish pie
Serving Suggestions
Chocolate pie is rich, so simple pairings work best.
- Serve chilled with a big dollop of whipped cream
- Add chocolate shavings or cocoa dust on top
- Pair with fresh berries for contrast
- A hot cup of coffee or cold milk is perfect on the side
For holidays, I like serving smaller slices—this pie goes a long way.
Storage & Reheating
Refrigerator
Store covered in the fridge for up to 4 days.
Freezer
Freeze without whipped cream for up to 1 month. Thaw overnight in the fridge.
Reheating
This pie is meant to be served cold. No reheating needed.
Nutrition Information (Per Slice)
Approximate values (based on 8 slices):
- Calories: 390
- Protein: 6g
- Fat: 18g
- Carbohydrates: 52g
- Sugar: 36g
- Fiber: 3g
- Sodium: 220mg
Prep, Cook & Total Time
- Prep Time: 20 minutes
- Cook Time: 15 minutes
- Total Time: 35 minutes + chilling time
(Hands-on time is minimal—the fridge does most of the work.)
Frequently Asked Questions
Can I use store bought chocolate pudding?
You can, but homemade chocolate pudding has richer flavor and a better texture for chocolate pie.
Why didn’t my chocolate pie set?
It likely needed more cooking time on the stovetop or a longer chilling time in the fridge to fully set.
Can I make this chocolate pie ahead of time?
Yes. Chocolate pie is best made a day in advance so the filling can fully chill and set.
Is this a baked chocolate pie?
No. The chocolate filling is cooked on the stovetop and then chilled in the fridge until firm.
Can I use a graham cracker crust?
Absolutely. A graham cracker crust adds crunch and pairs beautifully with the creamy chocolate filling.
How long does chocolate pie last in the fridge?
When covered properly, chocolate pie will keep in the refrigerator for up to 4 days.
Conclusion
This chocolate pie recipe is proof that simple desserts can still feel special. It’s rich without being overwhelming, easy without feeling basic, and full of that nostalgic comfort we all crave. Whether you use a homemade pie crust or grab a store bought one, the result is the same—a smooth, creamy chocolate pie that disappears fast.
If you give it a try, leave a comment, rate the recipe, or share it with someone who loves chocolate as much as you do. And don’t stress if it’s not perfect the first time—mine definitely wasn’t.
Happy baking (and chilling).
Chocolate Pie Recipe
Ingredients
- For the Pie Crust
- 1 9-inch pie homemade pie crust, baked and cooled
- For the Chocolate Filling
- 1 cup granulated sugar
- ¼ cup unsweetened cocoa
- ¼ cup cornstarch
- ¼ tsp salt
- 3 cups whole milk
- 4 large egg yolks
- 2 tbsp unsalted butter
- 1 tsp vanilla extract
- For Topping
- Fresh whipped cream
Instructions
- Prepare the Crust
- Make sure your 9-inch pie crust is fully baked and completely cooled before adding the filling. A warm crust can cause condensation and a loose set.
- Mix the Dry Ingredients
- In a medium saucepan (off heat), whisk together:
- Sugar
- Unsweetened cocoa
- Cornstarch
- Salt
- Break up any cocoa lumps now—it makes everything smoother later.
- Add Milk and Egg Yolks
- Slowly whisk in the milk until smooth.
- Add the egg yolks and whisk until fully incorporated.
- Don’t rush this step. A smooth base means a smooth chocolate filling.
- Cook the Chocolate Filling
- Place the saucepan over medium heat. Cook, whisking constantly, for 8–10 minutes.
- You’ll notice the mixture:
- First warms
- Then thickens
- Then turns glossy and pudding-like
- The smell will tell you when it’s ready—deep chocolate, slightly sweet, impossible to ignore.
- Finish the Filling
- Once thickened:
- Remove from heat
- Stir in butter and vanilla extract
- Whisk until fully melted and smooth
- I always sneak a spoonful here. Quality control taste-test, right?
- Fill and Chill
- Pour the hot chocolate pudding into the cooled pie crust. Smooth the top.
- Cover loosely and chill in the fridge for at least 4 hours, preferably overnight.
- This chilling time is non-negotiable—it’s what gives the pie clean slices.
- Top and Serve
- Right before serving, spread or pipe whipped cream over the top.
- You’ve officially made a homemade chocolate pie that rivals any bakery version.
Notes
- Use unsweetened cocoa for the best chocolate flavor and control over sweetness.
- Whisk constantly while cooking to prevent lumps in the chocolate filling.
- Allow the pie to fully chill in the fridge before slicing for clean cuts.
- Homemade or store bought pie crust both work well in this recipe.
- This pie is best served cold and topped with whipped cream just before serving.